How To Use JR Pass To Reserve Seats & Ticket – Step By Step Guide

Planning a trip to Japan with a JR Pass? Get ready to learn how to reserve your train tickets using the ticket machines, even if you don't speak Japanese! These machines can be found in most JR stations and are easy to use. With our step-by-step guide, you'll be able to reserve your ticket quickly and easily, ensuring a comfortable and convenient travel experience on the Shinkansen or local trains. No more waiting in long lines! So, let's dive in and become a pro at reserving tickets with your JR Pass.

Step 1 : Locate The Ticket Machine
The ticket machines are usually located near the entrance or ticket gates of the train station.
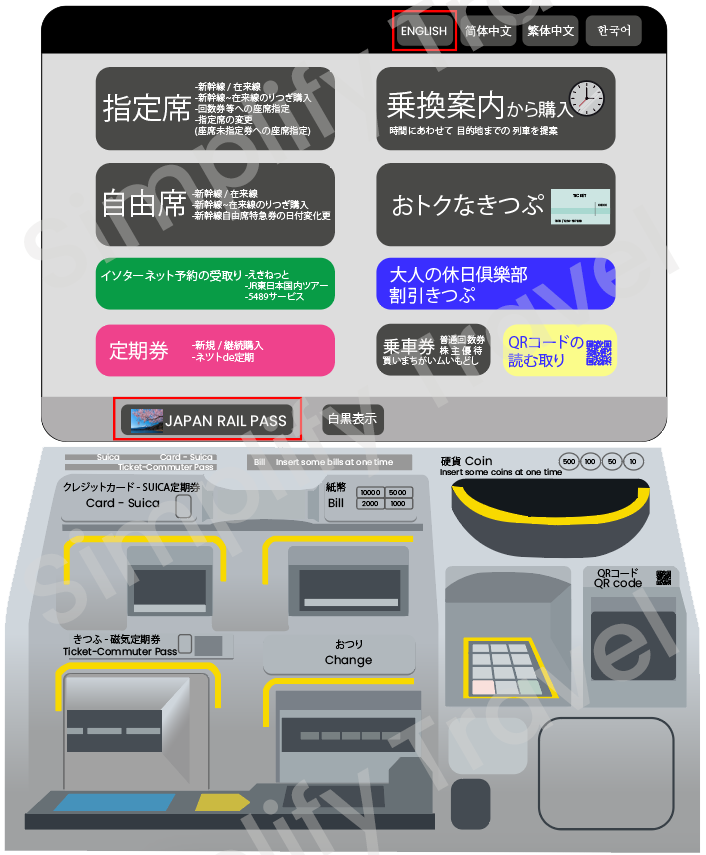
Step 2 : Select Your Language
Most ticket machines offer an English language option, which can be accessed by locating and pressing the "English" button.
Alternatively, you may choose to follow my approach and directly select the "Japan Rail Pass" option first.

Step 2 : Select Your Language
Select your preferred language.
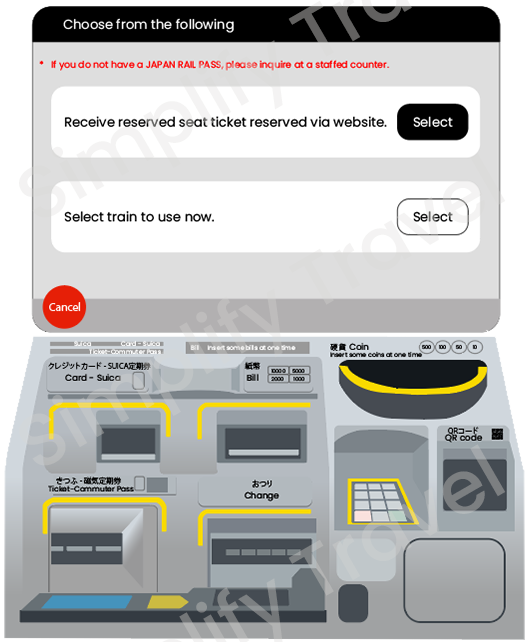
Step 3 : Select How You Will Reserved The Ticket
The “receive reserved seat ticket, reserved via website”, is only available to those who have purchased their JR Pass from the Official Japan Rail Pass website.
As for me, I bought my JR Pass from an overseas JR-designated sales office, so I will select the "select train to use now" option.

Step 4 : Select The Number Of JR Pass Users
Select the number of passengers.

Step 5 : Scan Your JR Pass
In order to register your JR Pass and the information it contains, the ticket machine requires you to scan the barcode on your pass.

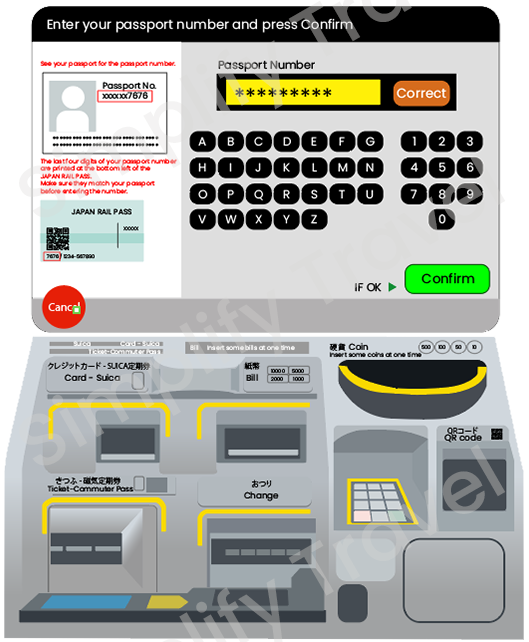
Step 6 : Enter Your
Passport Number
Ensure to enter the correct passport number that corresponds with the scanned JR Pass. The last 4 digits of your passport number are printed on the bottom left of your JR Pass.
It's important to verify that the passport number you enter, matches your actual passport number before proceeding.
Step 7 : Repeat Step 5 and 6, For More Than 1 JR Pass
If you are traveling in a group or with family members, you will need to repeat steps 5 and 6 for each individual. To simplify the process, it is recommended to save all passport information on your mobile device for easy reference. This way, you won't need to take out your passports one by one from your bag and put them back again.
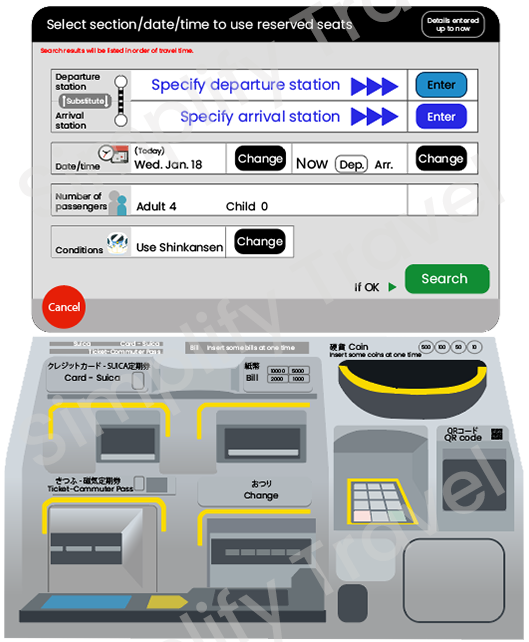
Step 8 : Select Your Departure Station
To specify your departure station, select the "enter" button on the screen.
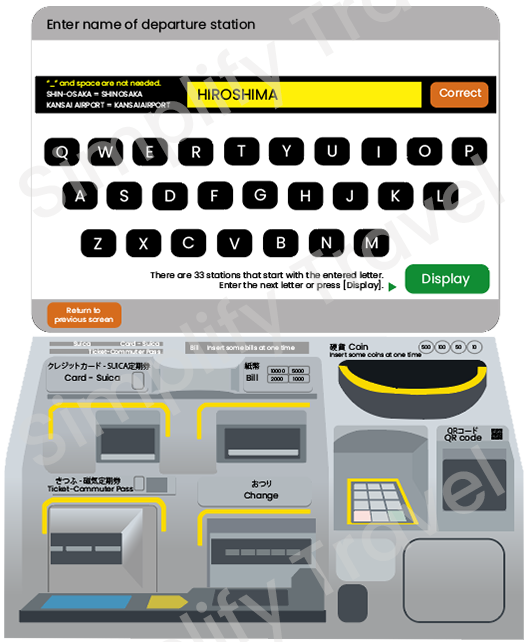
Step 8 : Select Your Departure Station
Enter the name of your current station or your intended departure station, if you wish to reserve your ticket in advance.

Step 8 : Select Your Departure Station
As you begin typing the station name, the machine will provide a list of suggested stations to choose from. From this list, you can select your preferred station.
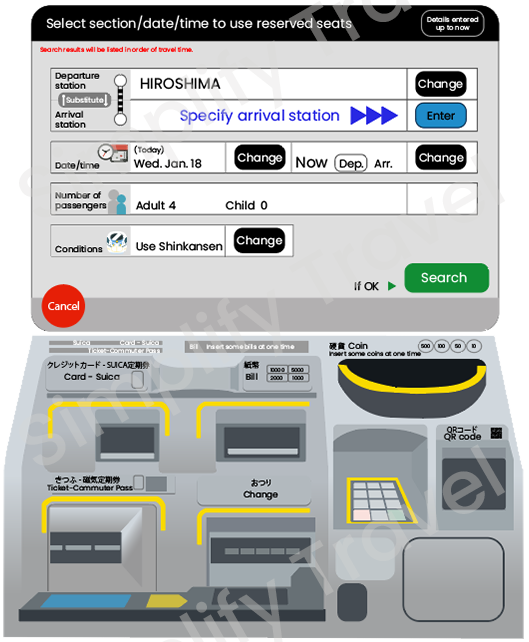
Step 9 : Select Your Arrival Station
To specify your arrival station, select the "enter" button, on the screen. Enter the name of your preferred arrival station.
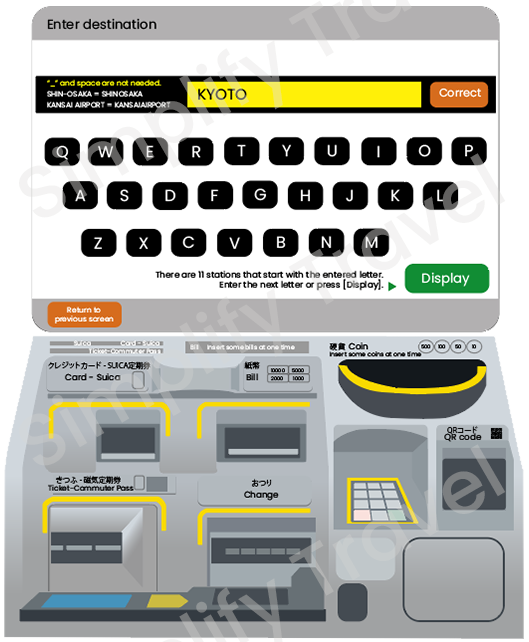
Step 9 : Select Your Arrival Station
Enter the name of your preferred arrival station.

Step 9 : Select Your Arrival Station
Select your preferred arrival station.
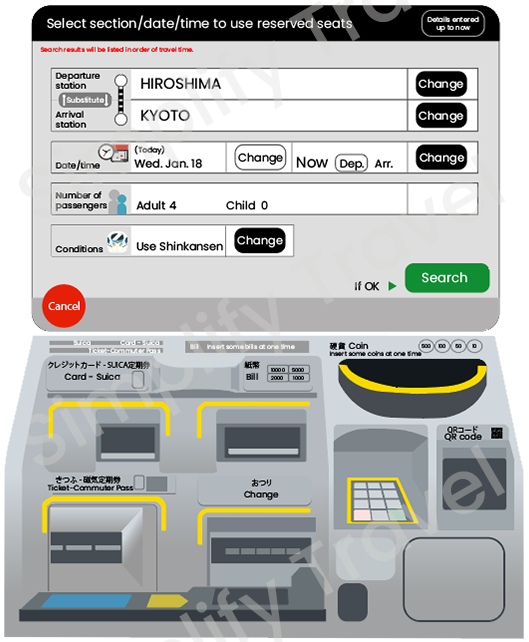
Step 10 : Change The Date, If Reserving Tickets In Advance
Select the "change" button.

Step 10 : Change The Date, If Reserving Tickets In Advance
Choose your preferred date from the available options.

Step 11 : Change The Time
Select the "change" button.

Step 11 : Change The Time
Enter your preferred time for either your departure or arrival station.
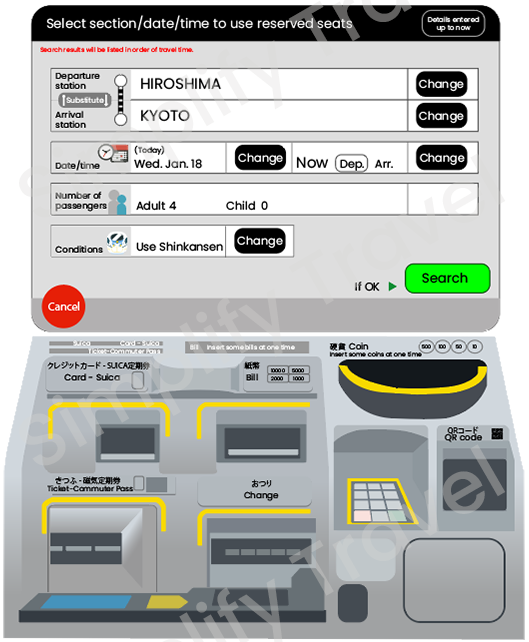
Step 12 : Search The Train
After you have entered all the necessary information for your preferred train, select the "search" button on the screen.
The machine will then search for trains that closely match your requirements.

Step 13 : Select Your Preferred Train
Review the options provided and choose your preferred one.
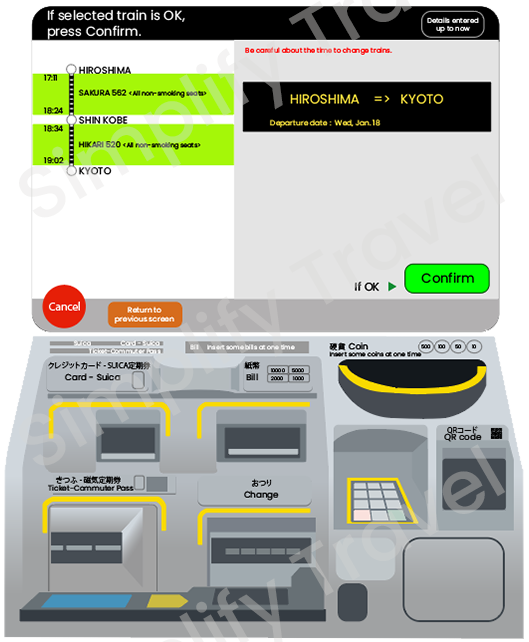
Step 13 : Select Your Preferred Train
After you have selected your preferred option, the screen will display your final selection for review.
Select the “confirm” button after verify all the information are correct.

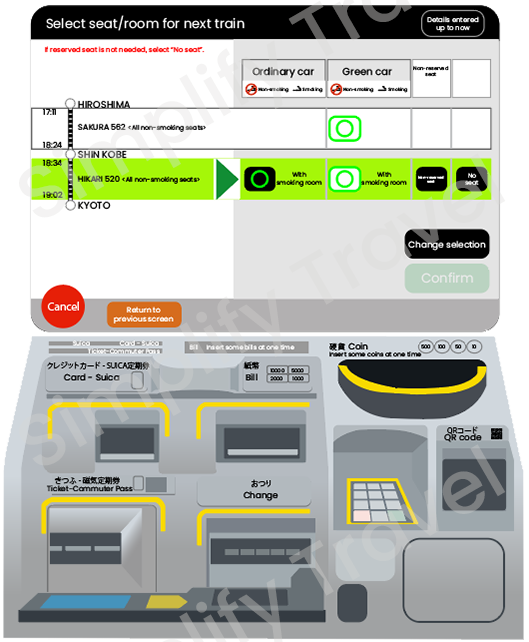
Step 14 : Select Your Train Car Type
Choose either the "ordinary car type" or the "green car type". The ordinary car type is equivalent to economy class, while the green car type is similar to business class.
Since I bought the green car JR pass, I will select from the green car column.

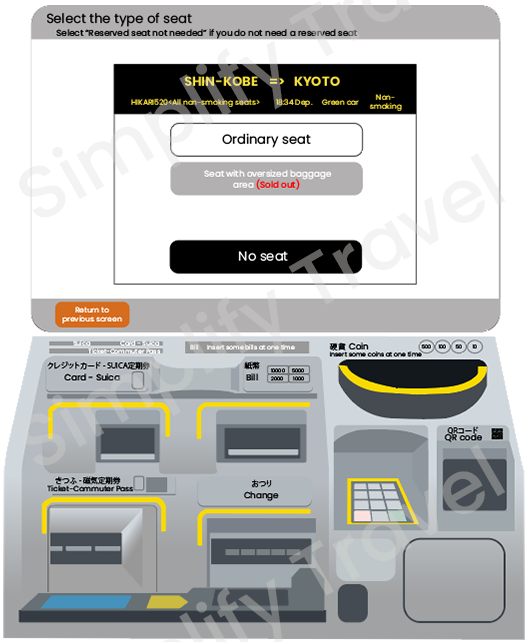
Step 15 : Select Your Seat Type
Choose your preferred seat type. There are two options available: the ordinary seat and the seat with oversized luggage space.
Since my luggage can fit in the overhead compartment and is not oversized, I will select the "ordinary seat".
Step 16 : Repeat Step 14 & Step 15 (If You Have Connecting trains)
If you have a connecting train like mine, you will need to repeat steps 14 and 15 for your next train.
Select the car type for your 2nd train.
Step 16 : Repeat Step 14 & Step 15 (If You Have Connecting trains)
Select preferred seat type.

Step 16 : Repeat Step 14 & Step 15 (If You Have Connecting trains)
After selecting the car type and seat types for both train, select the “confirm” button.

Step 17 : Select Your Seat Location
At this point, you will have the option to either select your seat from the seat map or let the machine assign one for you.
Personally, I prefer to choose my own seat, so I select the "select from seat map" button.

Step 17 : Select Your Seat Location
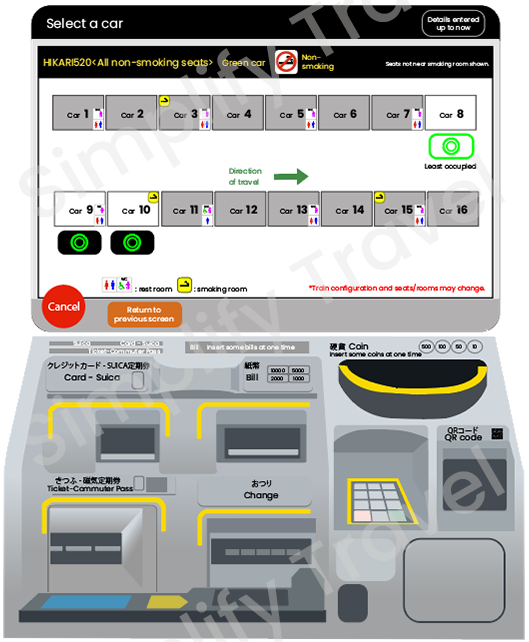
Select the preferred car type and location.
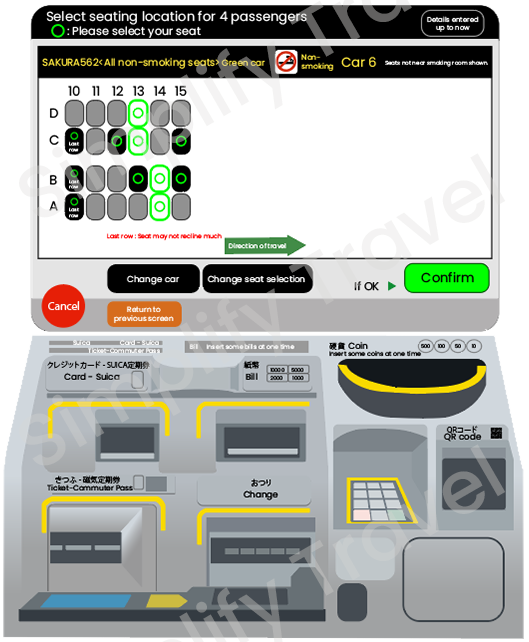
Step 17 : Select Your Seat Location
Choose your desired seat location.
Once the seat location has been chosen, select the "confirm" button.

Step 18 : Repeat Step 17 (If You Have Connecting Trains)
Select the “select from seat map” option for the 2nd train.
Step 18 : Repeat Step 17 (If You Have Connecting Trains)
Select the preferred car type and location.
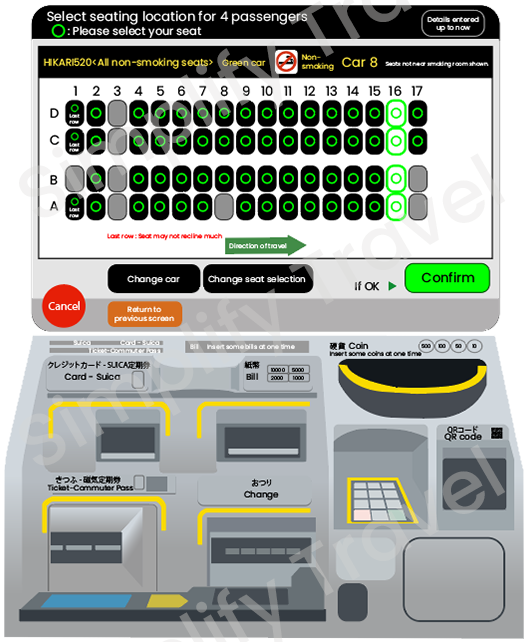
Step 18 : Repeat Step 17 (If You Have Connecting Trains)
Choose your desired seat location.
Once the seat location has been chosen, select the "confirm" button.
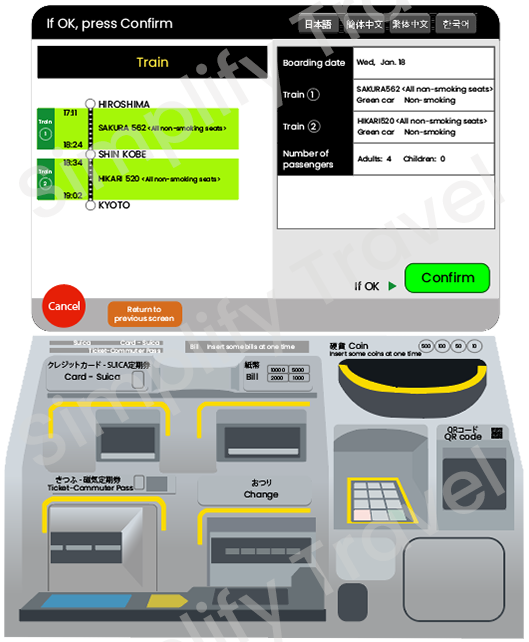
Step 19 : Review Your Trains Selections
Verify that all the information you have entered is accurate, then confirm your reservation by selecting the "confirm" button.

Step 20 : Collect Your Reserved Tickets
The ticket machine will generate all the necessary tickets including your seat numbers and other relevant information.
That's it! With these steps, you can easily reserve a ticket, using the ticket machine with your JR Pass in Japan. Remember to allow enough time before your departure to reserve your seat and collect your ticket.
Affiliate Disclosure:
The links for JR Pass may result in a small affiliate commission if you decide to purchase the recommended product at no additional cost to you.
-
Official Japan Rail Pass Website - https://japanrailpass.net/en/
Luggage Size Limit - https://japanrailpass.net/pdf/oversized_baggage_EN_230317.pdf
Overseas JR-designated Sales Office, Or Agency
List of Agents - https://japanrailpass.net/en/purchase.html#anchor02
JR Pass - https://click.jrpass.com/SH8T